How to Use Adoreshare Final Cut Pro Converter for Mac
Adoreshare Final Cut Pro Converter for Mac is the world's first video converter and editor for Final Cut Pro videos on Mac OS X. It allows you to import the MOV and DV video and audio files (which are two commonly-used video formats in Final Cut Pro) and then convert them to any other video files, so that they can be played on popular portable devices like iPhone, iPad, Kindle File, Samsung devices, HTC phones and tablets, etc. Meanwhile, you can also edit the videos as you like, such as trim, crop, rotate, watermark, add subtitle, extract videos/audios, merge multiple videos into one, and do more.
With this powerful tool, you have no need to worry about formats compatibility issues. To enjoy output videos from Final Cut Pro everywhere is simpler than ever.
Below is the user guide to show you how to use Adoreshare Final Cut Pro Converter for Mac to convert videos into any other formats.
Step 1. Import Final Cut Pro Video or Audio Files into the Program
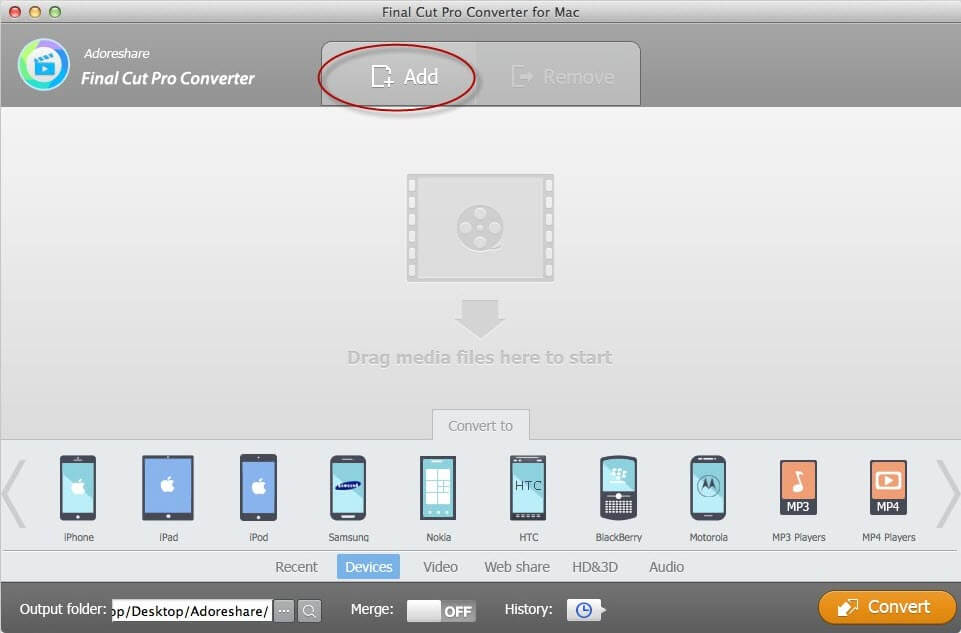
Download Adoreshare Final Cut Pro Converter for Mac on your Mac OS X, and then drag and drop it to Application to install it. Launch the program. You can import any Final Cut Pro video and audio files (MOV and DV file formats) into the program. To import video files, you can either click on "Add" button on the upper interface to add videos from your Mac machine, or just drag and drop the video files to the program directly. Batch of videos can be added at the same time for conversion.
Step 2. Edit Videos (Optional)
Adoreshare Final Cut Pro Converter for Mac is also the outstanding video editing software. After you add videos to the program, you are allowed to trim, crop, rotate, watermark video, or add subtitle, extract audio and change file name for video file. You can also skip this step if you have no need to customize the videos.
To edit the videos, click on the "Edit" button to open the edit window and get started.

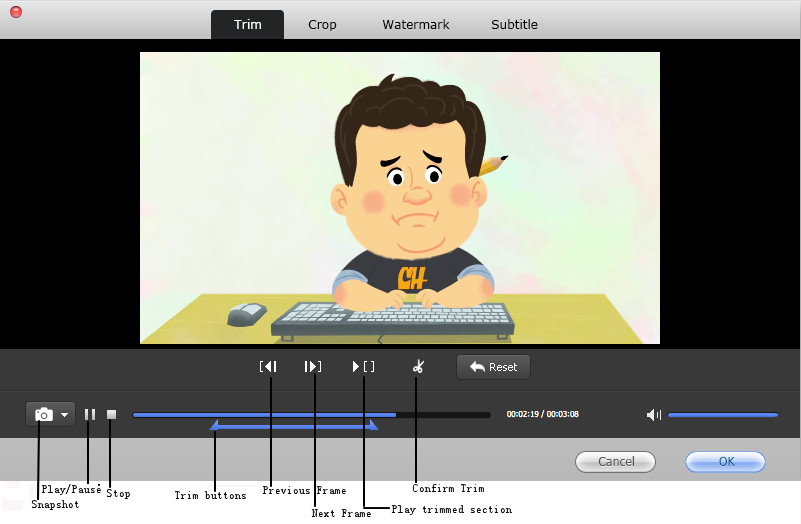
1. Trim videos
Drag the trim buttons to select the video section you would like to trim. You can also click on the Previous Frame/Next Frame button to define the video section more precisely. Click on the Confirm Trim button to split the trimmed video.
To preview the trimmed section, please click on the Play trimmed section button. If you click on the Reset button, it will cancel the trimmed section and start over.
During video playing, you can click on the Snapshot button to take screen shot.
Click on the OK button to confirm trimming and exit the Edit window.
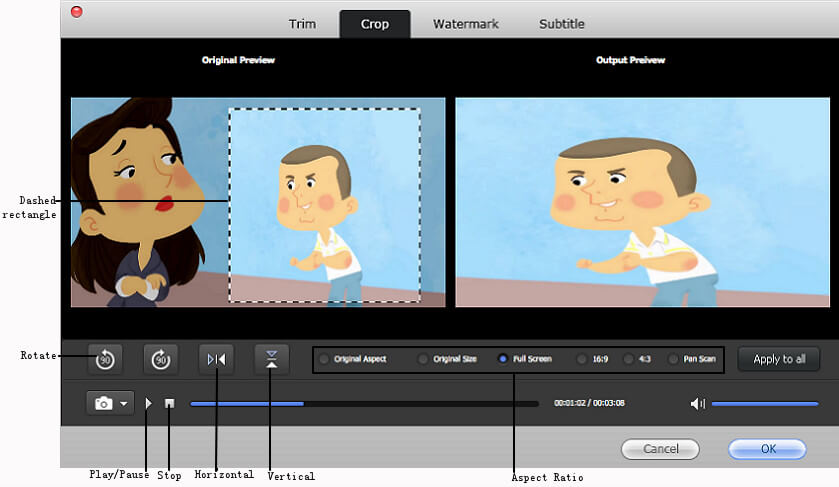
2. Crop Videos
In Original Preview window, there is a box with dashed rectangle. Drag the box to adjust the rectangle. Real-time effect can be seen in Output Preview.
Click on the Rotate button to rotate the video, and click on the  to flip Horizontally or flip Vertically. The Aspect Ratio enables you to select the ratio for the selected video within the rectangle.
3. Add Watermark
You can add text watermark and image watermark onto the videos.
To add text watermark, enter the text to the box and you will see the text displays on the video screen (text watermark is the default choice). Drag the dashed rectangle to adjust the text position and size. Click on the Font and Color button to customize the text. What is more, you can adjust the transparency of the text watermark.
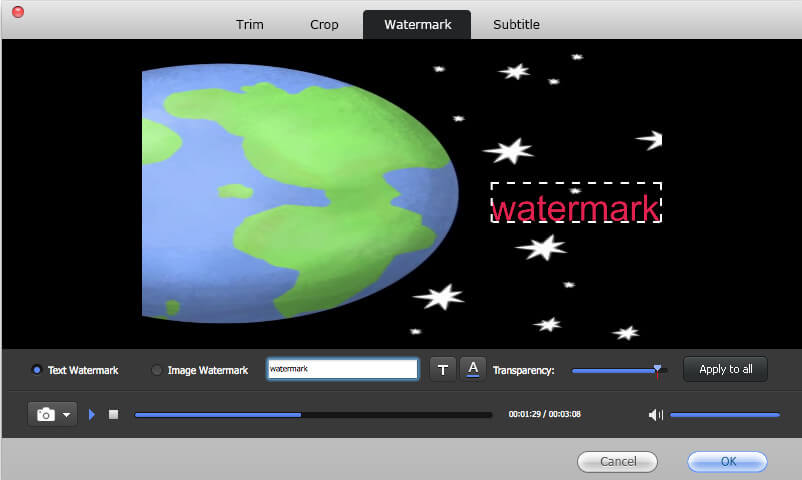
To add image watermark, select the "Image Watermark" and choose the image. Click on the add button to add image and you will see the image display on the video screen. Drag the dashed rectangle to adjust the image size and position. Click delete button can remove the image. What is more, you can adjust the transparency of the image watermark.

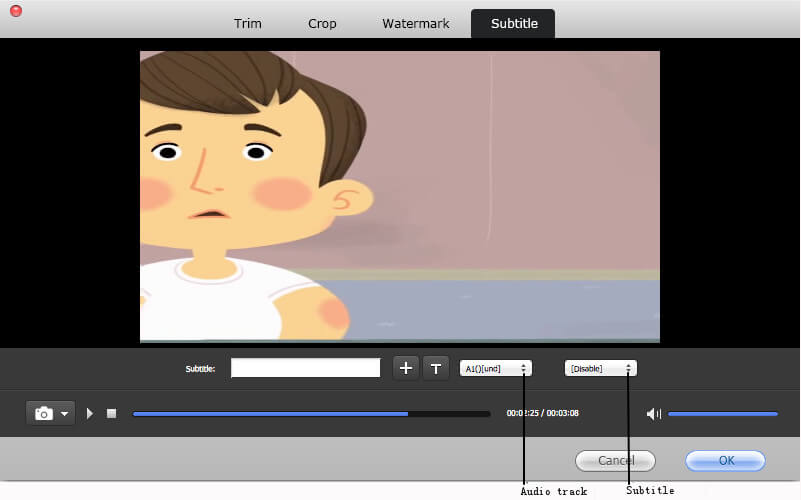
4. Add Subtitle
Click the add button to add subtitle. If the video supports multiple audio tracks and subtitles, you can choose Audio track and Subtitle from drop-down list.
5. Extract Audios
To extract audio only from movie, please click ![]() . In the drop-down list, please select Disable Video.
. In the drop-down list, please select Disable Video.
6. Rename videos
To change video name, please click ![]() . In the right writable frame, enter the new name you would like to change to.
. In the right writable frame, enter the new name you would like to change to.

Step 3. Select the Output Format
This software offers you a large amount of output formats and preset device compatible formats. There are six categories in the output formats list: Recent, Devices, Video, Web share, HD & 3D and Audio. Select your desired format here.

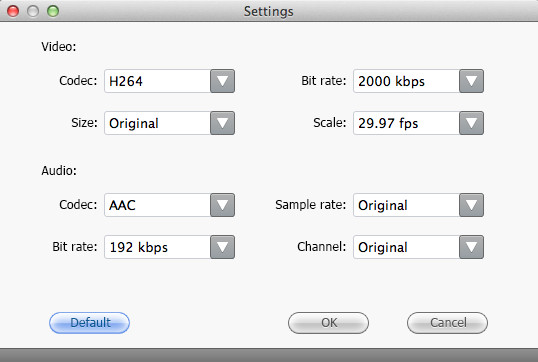
You are allowed to modify advanced parameters for your video: specify the output format and you will see the "![]() " button on the right of the format. Click it to enter output format setting center. In the pop up Window, please set the codec, bit rate, size and scale for video and audio and click "OK" to save them.
" button on the right of the format. Click it to enter output format setting center. In the pop up Window, please set the codec, bit rate, size and scale for video and audio and click "OK" to save them.
Step 4. Convert Videos to Any Format You Like
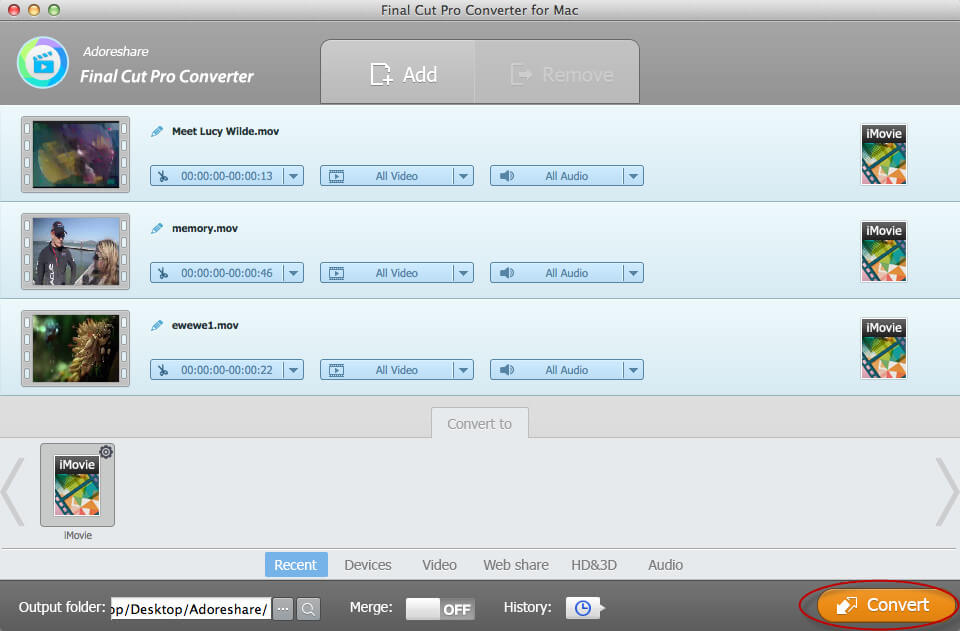
Specify an output folder by yourself if you don't want to save the converted videos to the default folder.
![]()
Switch the "Merge" to "On" position if you want to merge the multiple converted videos into one.
![]()
Click on the "Convert" button in the bottom right corner of the main interface to start video conversion. The whole conversion process depends on the length of the video. The larger size of the video, the more time it will take.
After finish, open the output folder and find the converted videos. Then you can freely play and share them.